Author Archives: Rich Bibby

About Rich Bibby

Rich is a Senior Network Engineer based in the UK, with a passion for all things Network Automation. Follow me on Twitter and GitHub

Juniper JNCIA-JUNOS – Review of Exam/Study

I passed the JNCIA-JUNOS (JN0-101) exam today 🙂 after a couple of weeks study, so thought I’d knock up a quick blog post about the experience and how it compares to other vendor exams I’ve taken.

Firstly, the main reason I went after this cert is that I worked on the deployment of a new data centre network built on the EX4500/4200 range of Juniper switches late last year, and now support it.  Having come from a primarily Cisco background I wanted to delve deeper into the Junos OS and how it compares to Cisco’s IOS.

Up until a couple of weeks ago the vast majority of my Juniper config had been done via the (very polished, I must admit) J-Web GUI.  Now, as we all know any network engineer worth his/her salt uses the CLI, and laughs at those who use a web interface that “my mum could use” to configure a switch with.

So, it’s been my aim for a while to “man up” and learn the Junos OS CLI, and then lo and behold our Juniper account manager offers me a free place on an online fast track course for the JNCIA-JUNOS exam along with a free exam voucher!  Obviously, I snapped his hand off and a few weeks later here we are with the exam passed, and me thinking that **cough** J-Web is firmly in the past and never to be mentioned again.

So, what about the course?  Well, it was a very enjoyable and easy way to study, broken into 3 x 2.5 hour online sessions, and also gave you access to four online lab sessions to hone your new found CLI skills.   The tutor followed the course outlined in two study guide PDF files freely available to anyone via the Juniper learning portal website: https://learningportal.juniper.net/juniper/user_fasttrack_home.aspx.

I took the approach of reading the study guides prior to the online course sessions, and then working through the lab guides on the GNS3 website (http://www.gns3.net/juniper-jncia-junos-introduction/) after building my own Olive based lab.

The exam itself I found to be pretty straightforward, and as long as you’ve read the two study guides and had some hands on lab time, then you are pretty much good to go.  The exam does include some general networking questions, so if you have a few years experience or have recently studied for your CCNA you should be fine.  I actually enjoyed the exam as well which is in contrast to previous (Cisco) exams that have all been very stressful experiences!

All in all, I am very pleased to have passed this exam, and in the process of studying for it my knowledge of the Junos OS has expanded massively.  I really enjoy working with Juniper kit, and feel some more Junos related blog posts are on the horizon……

Thanks for reading.

Rich


Follow Rich on Twitter

Adventures in VOIP (or how to make Avaya phones & Cisco switches play nicely)


I’m currently working on an Avaya VOIP implementation, and thought I’d blog about some of the configuration steps involved along the way.

First of all let’s set the scene with a massively oversimplified network diagram that shows how things hook together.  We have a DHCP server and an Avaya CS1000E Communications Server, a Cisco 2960S PoE switch, a PC and an Avaya 1120E IP Desk Phone:


Goals

Here’s a list of everything we need to achieve:

  1. Separate voice and data VLAN’s for the phone and the PC
  2. The switch to discover the Avaya phone and provide it with power over Ethernet
  3. The phone to learn it’s VLAN ID from the switch


For goal 1 we’ll create the VLAN’s on the switch, assign some ports to the data VLAN, and tell those ports what their voice VLAN is:


 access_sw(config-vlan)#vlan 105
 access_sw(config-vlan)#name Data_VLAN
 access_sw(config-vlan)#vlan 230
 access_sw(config-vlan)#name Voice_VLAN
 access_sw(config-vlan)#int range gi1/0/10-40
 access_sw(config-if-range)#switchport access vlan 105
 access_sw(config-if-range)#switchport voice vlan 230

This results in the following interface configuration:


 !
 interface GigabitEthernet1/0/40
 switchport access vlan 105
 switchport mode access
 switchport voice vlan 230
 spanning-tree portfast
 spanning-tree bpduguard enable
 end

Notice that we are not making the switch port into an 802.1Q trunk port as you might expect, rather it becomes a “Multi-VLAN access port”, that “trunks” both the voice and data VLAN’s out to the phone. The phone acts as a switch and has two physical NIC’s – one connected to the access switch and the other to the PC.  The result of this is that the phone operates on the Voice VLAN and the PC on the Data VLAN.

For goals 2 and 3, we need to get the switch and the phone speaking the same language.  Cisco devices use the proprietary CDP (Cisco Discovery Protocol) to learn about other connected Cisco devices, but to discover a non-Cisco device we need use a vendor neutral protocol.  Enter LLDP (Link Layer Discovery Protocol) referred to in the IEEE 802.1AB specification.

Luckily, enabling LLDP on a Cisco switch is easy. We’ll enable it globally (once enabled it can be controlled on a per-port basis):


access_sw(config)#lldp run

Now LLDP is running, lets see if the switch has discovered any phones:


access_sw#show lldp neighbors
Capability codes: (R) Router, (B) Bridge, (T) Telephone, (C) DOCSIS Cable Device
 (W) WLAN Access Point, (P) Repeater, (S) Station, (O) Other Device ID
Local        Intf     Hold-time Capability Port ID
192.168.52.1 Gi1/0/40 180       B,T        7038.ee08.66d0


So, the switch now knows about a device that speaks LLDP on port Gi1/0/40. let’s drill down a bit further:


access_sw#show lldp entry 192.168.52.1
Capability codes:(R) Router, (B) Bridge, (T) Telephone, (C) DOCSIS Cable Device
 (W) WLAN Access Point, (P) Repeater, (S) Station, (O) Other
 ------------------------------------------------
 Chassis id: 192.168.52.1
 Port id: 7038.ee08.66d0
 Port Description: Avaya IP Deskphone
 System Name - not advertised

 System Description:
 Avaya 1120E IP Deskphone, Firmware:0624C8A

 Time remaining: 177 seconds
 System Capabilities: B,T
 Enabled Capabilities: B,T
 Management Addresses - not advertised
 Auto Negotiation - supported, enabled
 Physical media capabilities:
 1000baseT(FD)
 1000baseT(HD)
 100base-TX(FD)
 100base-TX(HD)
 10base-T(FD)
 10base-T(HD)
 Media Attachment Unit type: 30
 Vlan ID: - not advertised

 MED Information:

 MED Codes:
 (NP) Network Policy, (LI) Location Identification
 (PS) Power Source Entity, (PD) Power Device
 (IN) Inventory

 F/W revision: 0624C8A
 Manufacturer: Avaya-01
 Model: 1120E IP Deskphone
 Capabilities: NP, LI, PD, IN
 Device type: Endpoint Class III
 Network Policy(Voice): VLAN 230, tagged, Layer-2 priority: 5, DSCP: 46
 Network Policy(Voice Signal): VLAN 230, tagged, Layer-2 priority: 0, DSCP: 0
 PD device, Power source: Unknown, Power Priority: High, Wattage: 6.4 
 Location - not advertised

 Total entries displayed: 1

As we can see, LLDP has done it’s job, the Cisco switch has learned about the Avaya phone and knows how much power to supply to it.  The phone has also discovered what the voice VLAN ID is.

Thanks for reading.

Rich


Follow Rich on Twitter

That was the year that was, so what’s 2013 got in store?

Well, that’s my first year of blogging done and dusted, so what did I achieve in 2012 and what would I like to do in 2013?  2012 was a really enjoyable year, and at the same time it was probably the most challenging of my career in Networking so far.

I started the year intending to achieve Cisco CCNP status in Routing and Switching by the end of it, but I only managed to pass one of the three required exams.  I did get to work on some great projects,  including a branch network in Madrid, a Data Centre built with Juniper EX4500/4200 switches,  a Cisco campus LAN refresh and some Check Point firewall upgrades.

The other highlights of 2012 include:

  • started blogging at http://nothenetwork.me
  • finally started to realise what a fantastic tool Twitter can be for connecting with Networking folk all over the world
  • passed Cisco SWITCH exam (one down, two to go!)
  • got to work with Juniper kit and learn some JunOS, albeit mostly using J-Web rather than the CLI

So, what about 2013?  Well, more of the same really!  I’d like to continue progress towards CCNP, but I’d also like to learn more JunOS, and maybe have a crack at a Juniper cert.   I’d also like to do more with my blog this year, so some goals for 2013 look like this:

  • pass Cisco ROUTE exam
  • pass Juniper Networks Certified Associate – Junos (JNCIA-Junos) exam
  • blog consistently, about Cisco, Juniper and Check Point
  • re-vamp the blog design/framework
  • get better at network diagrams
  • keep improving as a Network Engineer


There we go then, that little lot seems plenty to be getting along with!!  Lets see how we go……


Rich


Follow Rich on Twitter

Hello, is there anybody in there…..(or EIGRP basics)


Hello, is there anybody in there?  Just nod if you can hear my EIGRP hello packets being multicast to 224.0.0.10….


Apologies to any Pink Floyd fans out there, but the opening line to Comfortably Numb describes perfectly what happens when an interface starts participating in an EIGRP routing process (well, not really).

As we know from CCNA study, the config to set up basic EIGRP is very simple.  We just define the AS (Autonomous System) number, and which networks to advertise.  We’ll use the following network as an example to illustrate the process:


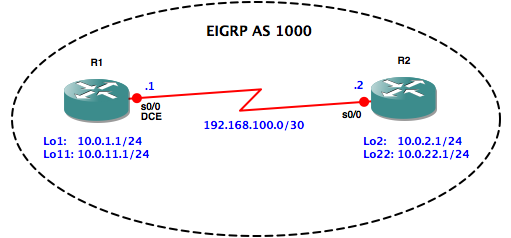
Let’s get EIGRP configured on R1 and get it advertising it’s directly attached networks.  We’ll use all zero’s wildcard masks for the loopback interfaces, to make them as specific as possible, and turn off auto summarization (EIGRP is a classless routing protocol, but it will still summarize networks using classful boundaries by default):


R1(config)#router eigrp 1000
R1(config-router)#network 192.168.100.0 0.0.0.3
R1(config-router)#network 10.0.1.1 0.0.0.0
R1(config-router)#network 10.0.11.1 0.0.0.0
R1(config-router)#no auto-summary


Next, lets check that the network statements we’ve used above have enabled EIGRP on the correct interfaces:


R1#show ip eigrp interfaces
IP-EIGRP interfaces for process 1000
                Xmit Queue  Mean Pacing Time Multicast  Pending
Interface Peers Un/Reliable SRTT Un/Reliable Flow Timer Routes
Se0/0       0       0/0        0    10/10         0     0
Lo1         0       0/0        0    0/10          0     0
Lo11        0       0/0        0    0/10          0     0


Remember that enabling EIGRP on an interface has two effects:

  • EIGRP Hello packets will start being sent out of the interface to multicast  address 224.0.0.10.  This means that neighbour relationships (adjacencies) can be formed with other routers directly connected to the same subnet and using the same EIGRP AS number
  • the network that the interface is part of will be advertised by the EIGRP routing process


To confirm that Hello packets are being sent, we’ll enable debugging of EIGRP packets:

R1#debug eigrp packets
EIGRP Packets debugging is on
 (UPDATE, REQUEST, QUERY, REPLY, HELLO, IPXSAP, PROBE, ACK, STUB, SIAQUERY, SIAREPLY)
R1#
*Mar 1 00:28:51.867: EIGRP: Sending HELLO on Serial0/0
*Mar 1 00:28:51.867: AS 1000, Flags 0x0, Seq 0/0 idbQ 0/0 iidbQ un/rely 0/0
*Mar 1 00:28:52.931: EIGRP: Sending HELLO on Loopback1
*Mar 1 00:28:52.931: AS 1000, Flags 0x0, Seq 0/0 idbQ 0/0 iidbQ un/rely 0/0
*Mar 1 00:28:52.935: EIGRP: Received HELLO on Loopback1 nbr 10.0.1.1
*Mar 1 00:28:52.935: AS 1000, Flags 0x0, Seq 0/0 idbQ 0/0
*Mar 1 00:28:52.935: EIGRP: Packet from ourselves ignored
*Mar 1 00:28:56.031: EIGRP: Sending HELLO on Loopback11
*Mar 1 00:28:56.031: AS 1000, Flags 0x0, Seq 0/0 idbQ 0/0 iidbQ un/rely 0/0
*Mar 1 00:28:56.035: EIGRP: Received HELLO on Loopback11 nbr 10.0.11.1
*Mar 1 00:28:56.035: AS 1000, Flags 0x0, Seq 0/0 idbQ 0/0
*Mar 1 00:28:56.035: EIGRP: Packet from ourselves ignored


This output shows that Hello packets are being sent out of the S0/0, Lo1 and Lo11 interfaces as we’d expect.  Note that the router ignores hello packets that it receives on in it’s loopback interfaces as it realises that these have been sent from itself.


We’ll also use the show ip protocols command to confirm we are routing for the correct networks:


R1#show ip protocols
Routing Protocol is "eigrp 1000"
  Outgoing update filter list for all interfaces is not set
  Incoming update filter list for all interfaces is not set
  Default networks flagged in outgoing updates
  Default networks accepted from incoming updates
  EIGRP metric weight K1=1, K2=0, K3=1, K4=0, K5=0
  EIGRP maximum hopcount 100
  EIGRP maximum metric variance 1
  Redistributing: eigrp 1000
  EIGRP NSF-aware route hold timer is 240s
  Automatic network summarization is not in effect
  Maximum path: 4
  Routing for Networks:
    10.0.1.1/32
    10.0.11.1/32
    192.168.100.0/30
  Routing Information Sources:
    Gateway         Distance      Last Update
    (this router)         90      00:15:51
  Distance: internal 90 external 170


So at this point R1’s config is done, but it hasn’t yet formed an adjacency with R2.   In order for two routers to form an adjacency, the following conditions must be met:


  • the two routers must have the same EIGRP AS number configured
  • the interfaces through which the two routers are exchanging EIGRP packets must be connected to the same IP subnet
  • K values (used in EIGRP metric calculation) must match on both routers


Next we’ll configure EIGRP on R2:


R2(config)#router eigrp 1000
R2(config-router)#network 192.168.100.0 0.0.0.3
R2(config-router)#network 10.0.2.1 0.0.0.0
R2(config-router)#network 10.0.22.1 0.0.0.0
R2(config-router)#no auto-summary


As soon as we enter the network statement for the 192.168.100.0 network on R2 we see the R1 <–> R2 adjacency come up:


R2(config-router)# *Mar  1 00:20:34.679: %DUAL-5-NBRCHANGE: IP-EIGRP(0) 1000:
Neighbor 192.168.100.1 (Serial0/0) is up: new adjacency
R1#
*Mar  1 00:20:24.475: %DUAL-5-NBRCHANGE: IP-EIGRP(0) 1000: Neighbor 192.168.100.2
(Serial0/0) is up: new adjacency


This is because R1 is listening for EIGRP hello packets on interface S0/0 and has now received one from R2 that contains a matching AS number and K values – therefore the adjacency will form.  We’ll use some extra show commands on R2 to verify the config:


R2#show ip eigrp neighbors
IP-EIGRP neighbors for process 1000
H   Address                 Interface       Hold Uptime   SRTT   RTO  Q  Seq
                                            (sec)         (ms)       Cnt Num
0   192.168.100.1           Se0/0            11 00:01:47   12   200   0   4

R2#show ip eigrp topology
IP-EIGRP Topology Table for AS(1000)/ID(10.0.22.1)

Codes: P - Passive, A - Active, U - Update, Q - Query, R - Reply,
       r - reply Status, s - sia Status 

P 10.0.11.0/24, 1 successors, FD is 2297856
        via 192.168.100.1 (2297856/128256), Serial0/0
P 10.0.2.0/24, 1 successors, FD is 128256
        via Connected, Loopback2
P 10.0.1.0/24, 1 successors, FD is 2297856
        via 192.168.100.1 (2297856/128256), Serial0/0
P 192.168.100.0/30, 1 successors, FD is 2169856
        via Connected, Serial0/0
P 10.0.22.0/24, 1 successors, FD is 128256
        via Connected, Loopback22


Finally, let’s check the routing tables of each router to confirm that each one has learned about the other’s attached networks via EIGRP:


R1#show ip route eigrp
 10.0.0.0/24 is subnetted, 4 subnets
 D       10.0.2.0 [90/2297856] via 192.168.100.2, 00:14:28, Serial0/0
 D       10.0.22.0 [90/2297856] via 192.168.100.2, 00:14:28, Serial0/0


R2#show ip route eigrp
 10.0.0.0/24 is subnetted, 4 subnets
 D       10.0.11.0 [90/2297856] via 192.168.100.1, 00:14:00, Serial0/0
 D       10.0.1.0 [90/2297856] via 192.168.100.1, 00:14:00, Serial0/0


All looking good!  In the next post I’ll cover some more EIGRP theory and config for CCNP study.

Cheers

Rich


Follow Rich on Twitter

What’s The Point Of Static Routes?

With clever, dynamic routing protocols (RIP, EIGRP, OSPF et al) being able to learn routes all by themselves, and even adapt to network problems by re-routing traffic when a link goes down, why would you even bother using boring old Static routes to get your packets to their destination?

Well, in defence of Static routes here are few reasons why you might use them:

  • It’s all gone a bit runny – your super-duper dynamic routing protocols have let you down, you can’t figure it out quickly and are in danger of being fired, unless…….you whack in a quick static route and bingo – all is good again and you can figure out the issue while your heart rate drops back to normal.
  • You might sleep better at night – if you’re a control freak and can’t bear the thought of anything happening without your say so on your precious network, then Static routes can help.
  • To give your router a break – you may have an old, creaking router that can barely send a packet on it’s way, never mind run a fancy dynamic routing protocol with all it’s processing overhead.
  • Keep it simple – you simply don’t have that much routing going on in your network, so perhaps dynamic routing is overkill.
  • You need a backup – dynamic routing with all it’s built in resilience not enough for you?  Bung in a Floating Static route for good measure.  With it’s AD set to higher than that of any dynamic protocols, it’ll only kick in if your dynamically learned routes drop out of the routing table.
  • There’s nowhere else to go – if your router has no idea how to get a packet to it’s next hop, then rather than just drop the packet it will give it a fighting chance and send it on to the router’s “gateway of last resort” AKA a Default Static route.

Configuring Static Routes

A Static route to network 192.168.10.0/24 network via a next hop IP address 10.0.0.1:
Router(config)#ip route 192.168.10.0 255.255.255.0 10.0.0.1

A Static route to network 192.168.10.0/24 network via local interface fastEthernet 0/1:
Router(config)#ip route 192.168.10.0 255.255.255.0 fastEthernet 0/1

A Floating Static route to network 192.168.10.0/24 via next hop IP address 10.0.0.1 with an AD of 200:
Router(config)#ip route 192.168.10.0 255.255.255.0 10.0.0.1 200
A Default Static route via next hop IP address 10.0.0.1:
Router(config)#ip route 0.0.0.0 0.0.0.0 10.0.0.1


Follow Rich on Twitter

CCNP ROUTE Studies – IP Routing Basics


Before getting into the detail of the various Routing Protocols, lets go over some of the fundamental concepts and principles of IP Routing, starting with an explanation of Distance Vector routing protocols…..


Distance Vector Routing Protocols

  • examples: RIP, IGRP, EIGRP
  • a router using a DV protocol knows 2 things:
    • Distance to final destination
    • Vector (or direction) traffic should sent
  • used in smaller environments where routes do not change often, such as a LAN’s
  • do not scale well, so not suitable for WAN’s
  • each DV router sends some or all of it’s routing table in updates, but only to it’s neighbours
  • DV routers only know about their neighbours
  • built in features for preventing routing loops:
    • Split Horizon – a routing protocol will never advertise a  route back out of the interface that the route was learnt on
    • Poison Reverse – if a network becomes unavailable then a router will advertise that network with a metric of 16 (max is 15) , which allows other routers to quickly learn that a network is unavailable


Distance Vector Routing Protocol Comparison Table:


RIPv1 RIPv2 EIGRP*
algorithm? Bellman-Ford Bellman-Ford DUAL
update method? broadcast multicast to 224.0.0.9 multicast to 224.0.0.10
update frequency? every 30 Seconds every 30 Seconds when there’s a change
update contains? whole routing table whole routing table only route changes
max routes per update? 25 25 n/a
classless? no yes yes
equal cost load balancing? yes, by default yes, by default yes, by default
un-equal cost load balancing? no no yes, with “variance” command
max hop count? 15 15 255 (100 is default)
authentication? no clear-text & MD5 MD5

*note – EIGRP is not a true DV protocol but has some features of DV and is included here for comparison.


How does a Router decide which route to use?

When a router knows of multiple routes to get packets to a particular destination network, it has to decide which is the best route to use.

Here is the logic that the outer uses to make the forwarding decision:

  1. multiple routes  =  route with longest Prefix wins
  2. multiple routes + same prefix length  =  route with lowest Administrative Distance wins
  3. multiple routes + same prefix length + same AD  =  route lowest Metric wins
  4. multiple routes + same prefix length + same AD  + same Metric  =  router will Load Balance


Administrative Distances


Type Of Route Administrative Distance
Directly Connected 0
Static (with exit interface) 0
Static (with next hop IP) 1
EIGRP Summary 5
External BGP 20
EIGRP (Internal) 90
OSPF 110
RIP 120
EIGRP (External) 170
Internal BGP 200
Unknown Network 255


So that’s a  bunch of the basics covered off, next post up is Static Routing…….

Cheers.

Rich

Follow me on Twitter

CCNP ROUTE Studies – Back to the Books!

So…..I passed my SWITCH (642-813: Implementing Cisco IP Switched Networks) exam back in March of this year, and after a lull of 5 months I’ve decided to get back on track with my certification goals.

One of my goals at the start of 2012 was to achieve CCNP certification in Routing & Switching by the end of the year.  In order to gain CCNP status a candidate is required to pass three exams, so with September now upon us my chances of achieving this goal are looking distinctly slim!!  However, I’m going to make it my goal to pass the ROUTE exam by the end of this year, leaving just TSHOOT left to take in 2013.

There are a number of factors I can put this down to, such as being extremely busy at work, trying to learn JunOS for a new project etc, but at the end of the day these are just excuses.

So, what’s given me this new found enthusiasm and motivation to get back on track?  Well, in a nutshell it’s the always excellent @packetpushers podcasts and in particular show 114, which featured CBT nuggets video instructor Jeremy Cioara.  This was a great show and listening to it you can’t help but get enthusiastic (in a geeky kind of way) about Cisco certifications.

Anyway, that’s enough waffle.  I’ll be posting again soon with my first lot of study notes for the ROUTE exam.

Cheers

Rich

Follow me on Twitter

Anatomy of a Check Point Upgrade

Having recently emerged relatively unscathed from a Check Point Smart Management Server upgrade, I thought I’d blog about the experience – mainly for my own future reference, but if it helps anyone else out then that’s great too!

I needed to get our SecurePlatform, Open Server based SMS from version R71.10 to R75.30, so I set about reading up on the process and planning my attack.  Here’s how I went about it….


Research

In order to get hold hold of the right information to plan this, I headed straight for my Check Point User Center. Although there are some superb sources of unofficial information out there (cpshared and CPUG in particular), I found that in this case the official docs were pretty much all I needed.

After studying the release notes and installation guides for the releases I was interested in (plus a quick sanity check post on the cpshared forum) I had my plan.  In a nutshell, there is no way of jumping directly from R71.10 to R75.30 – it has to be a multi-step process.

For information on the upgrade path to get me from version R71.10 to R75.30, I also checked out the Check Point R70, R71 and R75 Upgrade Map (requires a user centre account).  In my case the upgrade path was:

R71.10 –> R75  –>  R75.20 –> R75.30

The principle and process is basically the same for each step of the upgrade.  You need to export your current Check Point database using the migration tools from the release that you want to get to.  You then clean install your SMS to the next version in your migration path and import the database.  You then rinse and repeat until you get to the release you want.  Simple, right??

Actually it is pretty simple, just very time consuming!  The other step in each upgrade is to run the pre upgrade verification tool from the target version to make sure that your database is compatible before you export it.  DON’T forget to do this step as you will run into problems later if you do.  In my case the R75.20 verification tool flagged up a couple of objects that need to be renamed – a quick name change in Smart Dashboard and I was good to go after running the tool again.


Migration tools

A quick note on this before we plough on.  The migration tools used to perform export/import used to be called upgrade_export and upgrade_import.  The old script files still exist in the /$FWDIR/bin/upgrade_tools/ directory alongside the new migrate script.  The migrate script is exactly the same as the other two so feel free to use either.


Assumptions

This article assumes the reader has some knowledge of certain basics such as using SCP for file copy, extracting .tgz archives and running scripts on a Linux box.  If not then some of my other posts detail the export scripts and there’s a ton of material out there for the other bits, just a google search away.


What You’ll Need

Grab the following files from Smart Center:

  • Check_Point_R75.Splat.iso
  • Check_Point_migration_tools_R75.linux30.tgz
  • Check_Point_R75.20.Splat.iso
  • Check_Point_migration_tools_R75.20.linux30.tgz
  • Check_Point_R75.30_Upgrade.Splat.tgz
  • Check_Point_migration_tools_R75.30.linux30.tgz


Virtualize it!

Once you have the first database export taken from your management server, you can leave this box alone so it can remain on-line during the remainder of the process.  I then set up a Virtual SMS on an ESX server and carried out the rest of the upgrade steps on there until I had my final database export taken using the R75.30 migration tools.


Testing

I carried out a test plan after each stage of the upgrade, with most testing done in the VMWare environment and then final tests in production.  I also had the luxury of being able to build my new SMS on new hardware, meaning a roll-back to the original box was easy if required (it wasn’t!).  The tests mainly consisted of checking that SIC was maintained to all gateways and that site-to-site and remote access VPN’s were still up after the first policy push from the newer SMS.


The Plan

So, having done my research and set up my VM environment I was good to go.  Here are the steps I followed:

[R71.10 –> R75]

  1. copy the R75 migration tools onto the R71.10 SMS, and extract into /var/tmp
  2. run the pre_upgrade_verifier script and fix up any issues
  3. run the migrate tool to generate your database export, and copy off the box
  4. build VM SMS box as a fresh install of R75, and run a basic first time config, either through the CLI or the WebUI
  5. copy the database export file into /$FWDIR/bin/upgrade_tools
  6. run the migrate tool to import the database file
  7. TEST

[R75 –> R75.20]

  1. copy the R75.20 migration tools onto the R75 SMS, and extract into /var/tmp
  2. run the pre_upgrade_verifier script and fix up any issues
  3. run the migrate tool to generate your database export, and copy off the box
  4. build VM SMS box as a fresh install of R75.20, and run a basic first time config, either through the CLI or the WebUI
  5. copy the database export file into /$FWDIR/bin/upgrade_tools
  6. run the migrate tool to import the database file
  7. TEST

[R75.20 –> R75.30]

  1. copy the R75.30 migration tools onto the R75.20 SMS, and extract into /var/tmp
  2. run the pre_upgrade_verifier script and fix up any issues
  3. run the migrate tool to generate your database export, and copy off the box
  4. build new (non VM) SMS box as a fresh install of R75.20, and run a complete first time config either through the CLI or the WebUI.  This should include everything to match your existing SMS SPLAT config, such as reconstructing your routing table, adding administrator accounts etc, etc.
  5. upgrade to R75.30, either through the CLI or WebUI
  6. copy the database export file into /$FWDIR/bin/upgrade_tools
  7. run the migrate tool to import the database file
  8. TEST


Problems

The only issue I encountered was that after the final upgrade step to R75.30, the WebUI thought that my SMS was a 12000 series appliance!  Slightly concerning at first, but a quick call to my support partner revealed that this was a known bug in the WebUI code that decides whether the machine is an appliance or not.  Needless to say there was quick fix to sort this out.


Learnings

This was my first Check Point upgrade on a production network, and I learnt a hell of a lot during the experience.  A couple of the main things though are more practical than technical:

  • Never let your Check Point estate drop so far behind the latest release that your upgrade path ends up being as convoluted as mine was
  • Allow plenty of time. Really, plenty of it.
  • Use VMware to allow you to work on the upgrade whilst keeping your existing SMS on-line


I hope someone finds this stuff useful.  If you do, let me know!

Cheers

Rich


Follow me on Twitter

Check Point SecurePlatform Backup Options

One aspect of the Check Point SecurePlatform OS that I struggle to get my head around is backups.  There are a few different options, and during the course of researching an upgrade I came across the best explanation I’ve seen yet.  I’ve decided to grab a copy of the relevant text and post it in my blog for future reference here.

I cannot take any credit for this information, it is taken directly from a post on this very informative site: http://blog.sekiur.com.  So, a big thank you to the blog’s author .


Oversimplified Executive Summary

  • upgrade_export contains just Check Point configuration
  • A backup is an upgrade_export plus SPLAT OS configuration
  • A snapshot is a backup plus binary files, both Check Point and SPLAT OS
  • As a general rule of thumb, if your restoring on the same hardware a snapshot would be the easiest to use since it contains the most info and an upgrade_export would be the worst, since you’d have to manually restore the most stuff.

upgrade_export

  • It doesn’t backup any OS (i.e. SPLAT) settings, it only backup up CheckPoint settings
  • It will let you export on one OS and then import on a different OS (i.e. go from Windows to SPLAT)
  • You can upgrade_import on different hardware (i.e. go from IBM to HP)
  • You can restore an export from an older version to a newer version of CheckPoint. A SPLAT backup/restore requires that you have the exact same versions. Note that when upgrading from an older to newer version, you must use the newer version’s upgrade_export utility to create the export file.
  • It restores the product list as well. The SPLAT restore command won’t restore the Check Point settings if you don’t have the exact same products (and product versions) installed.

backup

  • A SPLAT backup will back up both the SPLAT OS settings as well as the CheckPoint settings
  • Basically it’s an upgrade_export with OS settings added in
  • Restoring a backup file requires the exact same software installation. I.e. you can’t restore a backup from R55 on to R60 (the HFA level must match as well). The installed product list must match as well. Note that you can still restore the OS settings even if your installed Check Point product list doesn’t match.
  • The SPLAT OS settings are hardware specific. If you restore the system settings you must restore on the same hardware. However, if you only restore the Check Point settings you can restore on different hardware. Restoring just the Check Point settings is essentially the same thing as doing an “upgrade_import” of an exported file.

snapshot

  • A snapshot is even better than a backup since it contains binary files. I.e. you can revert from R60 to R55 with a snapshot. The downside to this is that a snapshot file is much larger than an upgrade_export or backup file.
  • A snapshot can also roll you forward for minor software changes. For example if I revert from R60 HFA05 to HFA01 I can later revert back to R60 HFA05 from R60 HFA01
  • A snapshot cannot revert to a newer major release of Check Point. I.e. you can’t revert from R55 to R60.
  • If you’re reinstalling SPLAT on the same hardware you don’t have to install any HFA’s or change any configuration. Simply reverting to your saved snapshot file will restore all configurations and HFAs. The only stipulation is that the major software version must match. I.e. a R60 snapshot file will only work on a R60 install (regardless of HFA level).
  • You can only revert on the same hardware, since the snapshot file contains hardware specific SPLAT settings.

An exception to the rules

If you’re feeling lucky I’ve noticed that you can actually restore a backup file or snapshot file on different hardware as long as you:

  • Delete “/etc/sysconfig/hwconf” (this is automatically re-created during the reboot)
  • In the case of a snapshot file also delete “/etc/modules.conf

**Backups don’t contain this file

**modules.conf controls which drivers are loaded

**This is be automatically re-created during the reboot

  • Remove the “hwaddr” lines from /etc/sysconfig/netconf.C
  • Reboot

You must remove the hwaddr lines since the firewall will use the MAC addresses stored in the snapshot/backup file, not your network card’s physical MAC addresses. You can verify which MAC addresses you’re using with these commands:

  • ifconfig | grep HWaddr  – This shows which MACs you’re currently using
  • grep hwaddr /etc/sysconfig/hwconf -This should contains your NICs’ physical MAC addresses. If in doubt, delete this file, reboot and this file will be automatically created on startup.
  • grep hwaddr /etc/sysconfig/netconf.C -This shows which MACs your server is configured to use. If there are no “hwaddr” lines, then your NIC’s physical MACs will be used. If there are no “hwaddr” lines you can create them by running “cpnetconf store“.
  • To remove the hwaddr lines in “/etc/sysconfig/netconf.C” run these commands:
        cd /etc/sysconfig
        cpstop
        mv netconf.C netconf.C.old
        grep -v hwaddr netconf.C.old >netconf.C
        rm /etc/sysconfig/hwconf
        reboot

How To – Back up and restore Check Point SecurePlatform Gateways and Managemement servers

This blog post details how to back up and restore Check Point Security Management Servers and Security Gateways running on the SecurePlatform OS, on Open Server hardware.

There are two types of backup available – Snapshot and Backup.

**note** it is recommended to only carry out backup procedures during a maintenance window due to the performance impact it will have on the device and the fact that the snapshot process will stop and re-start the Check Point services. Also, be aware that backing up a management server will fail if any SmartConsole connections are active.

Also, there is a third backup option for Management servers, called Upgrade Export which is used when you are upgrading to a newer version of the OS.  For a fantastic overview of all the options, take a look at this post on the excellent CP Shared forum.


Snapshot

A snapshot takes an image of the whole system, including device drivers, HFA’s and Hotfixes.  Typical scenarios where you would want to use the snapshot method would be:

  •  You are about to make a major change to the system eg. software upgrade. Take a snapshot prior to the upgrade and if it all goes horribly wrong you can always reset the box back to the exact state it was in before you broke it (useful to prevent tears/tantrums in the early hours of the morning during your change window)
  • Snapshot after an upgrade, and use it as a means to rebuild the box if it dies. Restore the snapshot and then and add the most recent backup (think of as incremental backups) to get you up and running again.

The snapshot will generate a large file (typically at least 1GB for a SCS) and can only be restored onto the same machine ie. same hardware and OS version.  Remember also to copy the snapshot file off the box to another location on your network, otherwise the snapshot is completely useless if the hard drive fails (the same goes for a backup).

Snapshot via the CLI:

  1. run the command: snapshot
  2. select the location you wish to save the file to, supply any credentials for ftp or scp servers, and supply a name for the snapshot file
  3. if you select a local, the snapshot file will be created in /var/CPsnapshot/snapshots, so copy the file from here into a safe location on your network if you selected the local option in step 2

Rather than follow the menu prompts you you can specify other parameters with the command, such as the name you want to give the file and your remote server details. To see a list of options type snapshot -h.

For example, to take a snapshot and copy it to your TFTP server with the file name “scs_snapshot_20052012”:

[SCS]# snapshot -t 192.168.10.10 scs_snapshot_20052012

To restore from a snapshot:

You can restore a snapshot from a file located in /var/CPsnapshot/snapshots, or from a network location. Simply type the command revert in expert mode, select the source (local, tftp, ftp, scp server) and file name.

As with the snapshot command, you can specify extra options. For a list of options available with this command, type revert -h.

Backup

A backup is very similar to a snaphot, in that in contains all the Check Point configuration, networking settings (routing info etc), but it does not include device drivers, HFA’s and Hotfixes.  The the idea is that you would restore the backup onto onto the same machine ie. same hardware, OS, Check Point version and patch level.

Backups can be run without stopping the Check Point services, and the backup files are typically much smaller than with a snapshot (as they contain only the configuration information).

Backup via the CLI:

  1. run the command: backup
  2. by default the backup file will be created in /var/CPbackup/backups, so copy the file from here into a safe location on your network
  3. as with snapshots, you can supply parameters with the command such as the FTP server details and also schedule a backup.  type backup -h for more info.

To restore from a backup:

In order to restore from a back up, you must first have installed SPLAT and all the required Check Point components and hot fixes etc.  You can restore a backup from a file located in /var/CPbackup/backups, or from a network location. Simply type the command restore, select the source (local, tftp, ftp, scp server) and file name.

Once you’ve selected the back up file to restore from, you can then chose to modify which information to restore, the “system” or “cp_products”.  So for example if you wanted to restore your backup onto new hardware, you could first install the OS, and then just selectively restore the Check Point configuration.

As with the backup command, you can specify extra options. For a list of options available with this command, type restore -h.

Backup via the WebUI:

1.  log onto the device via https://<IP-Address>  (the default port is 443 unless it has been changed to avoid a clash with SSL VPN)

2.  select Device –> Backup –> Back Up Now

3.  select the location you wish to save the file to, supply any credentials for ftp or scp servers, and optionally select to include logs files in the backup.  Then click Apply

4.  click Yes to proceed.  (on a management server note the warning to close GUI clients)

5.  to view the status of the backup, click View Backup Log


**note** it is not possible to restore from a backup via the WebUI, it has to be done via the CLI.